Image, video and iframe management in Mosaic

Legal obligations

You must comply with the law when showing images on your website, specifically copyright and data protection laws. 

Before uploading an image to your site, you need to obtain

  • permission to use the image from the copyright owner (if that is not the University or your department)
  • consent in line with the General Data Protection Regulation (GDPR) from any persons who can be identified on the image

For more information, please refer to copyright guidance and information about consent on the Data Privacy site.

Displaying picture credits on your Mosaic site

If the University owns the copyright

Images for which the University owns the copyright do not require credit information on the images directly. Copyright ownership can be acknowledged on the Picture Credits page (link in the footer of your site). Template text will be provided by the project
team. 

You might choose to acknowledge photographers on your Picture Credit page as a courtesy, even if the copyright is owned by the University. 

If someone else is the copyright owner

You must obtain the permission of the copyright owner. Mark the image in accordance with any instructions they may give you. If possible, add the year when the image was first published.

The copyright owner could be 

  • a photographer (for example © John Doe 2015)
  • an organisation (for example © Worcester College 2016)
  • a stock image provider (for example © Shutterstock 2018)

Technical guidance on how to display photo credits in Mosaic can be found below. 

Image management

The guidance below covers copyright display, management of images by template or content type, how to embed videos and add i-frames. 

Alt text

It is a requirement that all images carry an 'alt text' - a text description of the content of the image which can be used by screen readers to describe the content of the image. It must adequately explain what the image shows, and the more detail (within
reason), the better - it is insufficient to simply give the title of the image.

In Mosaic. 'alt text' is a field that can be completed when editing an image. Go to Manage Content > Files > Edit the image in question > Complete the 'alt text' field, which is in the 'File properties' tab towards the foot of the page.

Image-only representation of information

Whilst an image can be used to provide an additional way of delivering information to 'sighted' users; it cannot be the only way in which this information is provided. It is insufficient to rely on the user gathering information from an image. For example,
you should not put on your site an annotated screenshot of a process without also providing on the page a text description of how the user completes the process, which you are showing. Images should be used to enhance, rather than replace, 'text-based'
information.

Complex Images

Complex images contain more information than can be conveyed in a short phrase or sentence. 

These are typical: 

  • graphs and charts, and flows; 

  • diagrams and illustrations 

  • static maps  

It is important that complex images should include both a short description via the alt text and a longer description within the page. 

Long descriptions 

Complex visuals can be challenging to understand by many people – particularly those with learning disabilities and low vision. 

Long descriptions benefit all users; you can do this by making them part of the content. Also, considering reducing unnecessary complexity in your images and make them easier to understand for everyone. 

For example, including content within the page such as “The following graph shows that student numbers have increased year on year since 2019, up to 2021”. They help to point out the relevant information that the image is intended to present. 

Description containing structured information 

When describing a flowchart, always include a short description, “flowchart of operational response to fire”, through the 'alt text'. Then extended description provides more detailed information, including
scales, values, relationships, and visually represented trends.  

For example, long descriptions indicate timescale, consistent figures, or declining figures. You can include a note below the image, which will link to either a part of the page with a complete description of the visual or a separate page
altogether.

The text link needs to include the destination and associate it with the image.

Example: 'Note: See full long description associated with the above flowchart of operational response to fire'.

View guidance on how to structure the description within the 'Long Descriptions for Complex Images' section below.
Expand All

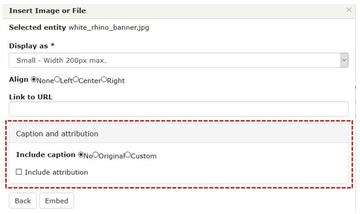
During the process of inserting a picture in a WYSIWYG, you will be given the option to display a caption and/or attribution:

  • The caption describes the content of the picture
  • The attribution should be used to credit/acknowledge the photographer or copyright holder
How to choose to display the caption and attribution


These can be set for the picture via the options when uploading or editing an image:

How to insert caption and attribution for an image


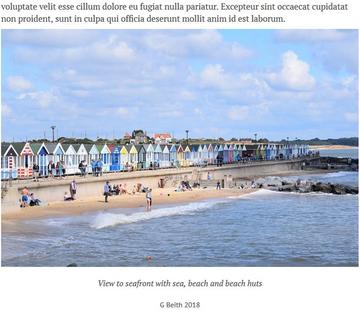
When set the caption and attribution will appear as below:

How the caption and attribution will appear on an image when they have been set

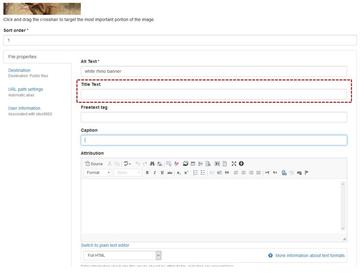
When an image is used in a situation outside a WYSIWYG - for example it is used in a grid or listing, or set as a banner image - the Title text should be used to display an acknowledgement or credit. This is set via the options when uploading or editing an image (type ALT then 0,1,6,9 to input the copyright sign):

How to insert title text


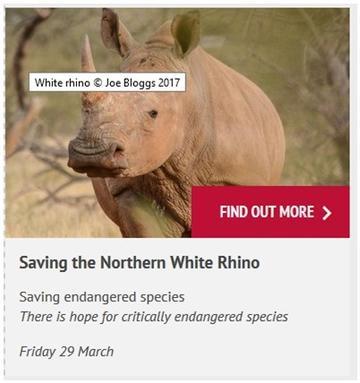
It appears when the user hovers their cursor over the image:

How to title text appears when user hovers cursor over image

Ideally all uploaded images will have dimensions of at least 640 by 400 pixels. Larger images, for example to display full width within a WYSIWYG area, need to be 800 pixels wide. Banner images should be at least 1728 by 520 pixels. Smaller images can be uploaded, but will be resized and may appear pixelated to the end user. Allowed file types are png, gif, jpg, jpeg and svg. Image files must be less than 5mb.

Prepare image files in advance and give them professional and informative names, the file name will be visible to end users of the website.

Also think about the following attributes;

  • file name: populated from the name of the file you upload
  • alt text: compulsory for accessibility reasons, as this is read by screen readers & search engines.  It should be used to describe an image or explain the contents of an infographic.
  • title text: text that appears when you hover over the image and is required if you need to credit the copyright holder and the image is displayed outside a WYSIWYG widget, in other words in a grid, listing or banner
  • free text tag: enables you to search by tag in the media library
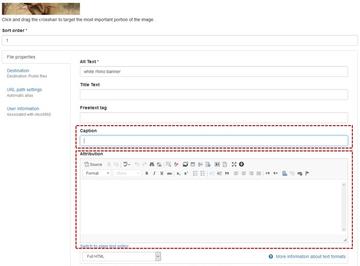
  • caption: describes the content of the image and you have the option to display this in WYSIWYGs or image galleries
  • attribution: for crediting the copyright holder and you have the option to display this in WYSIWYGs or image galleries

Alt text, caption and attribution can be added after the file has been uploaded. Further information on file names and file attributes can be found within Writing for UAS websites. The Focal point for the image can also be adjusted later. More information on Focal points can be found in section Cropping images.

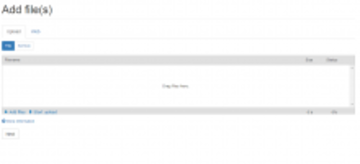
One way to upload files in Mosaic is to navigate to Manage content and select the Files tab. Click on the '+ Add file(s)' button and drag one or several files into the upload field on the screen, then click 'Next'. If the files are large it can take a few minutes for the upload to finish, it is ok to leave the upload running in the background.

How to upload a file

When editing content click ‘Browse’ to open the Media browser and search for a file to use from the site’s media library or open the Upload tab to upload a new file.

Select Edit from within Manage Files to update the attributes of an image or to replace the file in Mosaic with a new image file uploaded from your computer. Clicking Edit next to an image when editing content gets you to the same place.

Double click on an image within a WYSIWYG to change the display style or url link.

Tip! If you wish to change the image you have used click Remove and then browse for a new image. Selecting Edit and then Replace will overwrite the file in the site’s media library with a replacement.

This template uses a banner to display a hero image which will expand to the full width of the main content area. The image used should ideally be a minimum size of 1728 by 520 pixels. Using a smaller image will cause it to be expanded which could result in a blurry image. The image size doesn’t have to be exact, it will be cropped and resized to fit. Ensure the Title of the image is left blank.

The size of the displayed image in a listing will vary depending on which style the list uses. Therefore it is better to upload a listing image of at least 640 by 400 pixels where possible and let Mosaic resize. It isn’t essential to use images in a listing. If the items being displayed wont all have a listing image associated then use a listing style with no image.

Main image should ideally be a minimum size of 1728 by 520 pixels . Listing image of at least 640 by 400 pixels where possible and let Mosaic resize . Don’t need to have both. Make sure have good image if taxonomy will make it appear on the homepage.

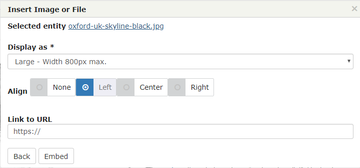
The lead article in the Newsletter template uses layout 40:60. When inserting an image for the article choose display size Large – Width 800px max.

How to insert an image and choose its display size

Subsequent articles layout is 75:25. When inserting an image choose image display size Medium or Medium square, depending on the shape of your image and the length of the article. 

The image associated with a person’s details will appears on the person profile page and also when the content item is displayed in a list. 
On the person page, the photo is displayed at 300 by 340 pixels but the size of the displayed image in a listing will vary depending on which style the list uses. Therefore it is better to upload an image of 640 by 400 where possible.

There are several ways to use images within a WYSIWYG content area.

  • To display one image the full width of the WYSIWYG area use an image which is at least 800px wide and choose Display as Large, Width 800px max.
  • To display multiple images in a row use column layout and insert an image into each column making sure you choose Display as either 6:4 or 4:3 for each image. Use the same Display as value for each image. The best style to use depends on the content of the images. 6:4 will be shorter and wider, whereas 4:3 will give you a slightly taller, narrower image. 

An image gallery may be used where multiple images need to be displayed as thumbnails with the option to open the full size image. There is no need to upload a thumbnail version of the images.

The thumbnail gallery setting should be narrow, so the full width option is NOT ticked.

Icons to use in Information cards will be pre-loaded as image files into your site’s media library. 

When an editor selects an item style for using with a Grid, List, Carousel  etcetera Mosaic makes a crop of the List Images of the content included in the widget, taken from the original images uploaded into the media library. The crop is nearly always landscape and will aim to centre the cropped image over the crosshair (focal point) the editor set on the image. The exact size depends on the item style selected: different cropped versions of the image are made dependent on the selected item style.

How well this works depends on whether the original image was portrait or landscape, how big it is in relation to the crop size, and where the crosshair was set - the closer this is to the edge of the image the worse the result is likely to be. 

Additional variables such as how many items are selected per row, whether the list or grid is in a narrow or wide region of a page and whether it is viewed on a desktop, tablet or smartphone can also affect the appearance of the final image used. The way Mosaic does this, is to re-frame the cropped image using an appropriate aspect ratio for the selected options/context and show only the part of the image within the frame.  

There are two tips for the best way to help Mosaic to deal with this:

  • have the focal point of the image as close to the centre of the original as possible
  • make the original image a bit more 'zoomed-out' than you would otherwise make it, with the key part of the image smaller within the overall size

Where an image is not displaying well you might want to consider the following options:

  • select different configuration options, for example use three or four items per row rather than six
  • select a different item style if there is an option that works better, for example tile landscape square image
  • instead of using a filtered or selected list, which uses the content's List Image, build the grid/widget statically and use a separate version of the image optimised for different cases where it will appear

It is important that complex images should include both a short description via the alt test, along a longer description within the page.


The page or section would breakdown of the complex images, and it would consist of the following; 

Title [Name of process] 

Start  

  1. Process step one [description] 

  • If yes, move to step 2 

  • If no, move to step 3 

  1. Process step two [description] 

  • Instructions for completing process step 2 

  • Upon completion of process step 2, stop. 

  1. Process step three [description] 

  • Instructions for completing process step 3 

  • Upon completion, proceed to process step 4 

  1. Process step three [description] 

  • Instructions for completing process step 4 

  • Upon completion of process step 4, stop. 

Grid listing is an effective format where the articles/pages all have a listing image. Listing style to use should be Tile: Without rollover or Tile:Landscape - square image.

Videos should be uploaded to YouTube, and then use the embedding feature, rather than hosting them on Mosaic or Sharepoint. Dedicated video hosting sites provide a much better user experience, so even if it may seem time-consuming to upload it, the effort is worth it. To embed the video:

In the WYSIWYG, click the 'Insert Image or File' icon at the place where you want the video to embed.

  • Click 'Browse', and then 'Upload from web' in the top right corner.
  • Paste the url for the video in the empty field, in other words the address from the navigation bar, and not the 'embed code' provided by YouTube. Click 'next' – it may take a short while to move to the next step - and then 'save', and then 'next'
  • Change the alignment position to 'Center' and click 'Embed'.

Always ensure that before you upload the video to YouTube you have the necessary permission to do so, and that you give credit the appropriate parties.

I-frames can be used to embed content into a WYSIWYG, for example from YouTube or Oxmaps

The source site will provide a line of html code which you should copy. In the WYSIWYG on Mosaic, click the 'Source' button in the icons above the WYSIWYG region, and paste the code at the point of the page at which you want it to appear.

Complying with accessibility requirements

To comply with accessibility requirements, you must ensure that all i-frames have a title added to the code which describes the content which has been embedded. In some instances this may be included automatically, but in others you must add your own. To do this, identify the line of code you have added to the source. After the code <iframe but before the > which ends that section, type title="x" replacing x with the title of the content.

So, for example:

<iframe width="560" height="315" src="https://communications.admin.ox.ac.uk/%3Ca%20href%3D"https://projects.it.ox.ac.uk/%3Ca%20href%3D">https://projects.it.ox.ac.uk/%3Ca%20href%3D"https://www.youtube.com/embed/emDgfyt3ca4">https://www.youtube.com/embed/emDgfyt3ca4" frameborder="0" title="Youtube video of Oxford University Temporary Staffing Service wordle"  allow="accelerometer; autoplay; encrypted-media; gyroscope; picture-in-picture" allowfullscreen></iframe>

Assistance with UAS websites


Lead editors - email uas.communications@admin.ox.ac.uk

Site editors should only contact the lead editor of their site

See information on the UAS website support process